Pic Monkey Collages {for Tech Tuesday}

You know I adore PicMonkey as evidenced here and here.  Did you know PicMonkey is a cycling team sponsor? Woot!


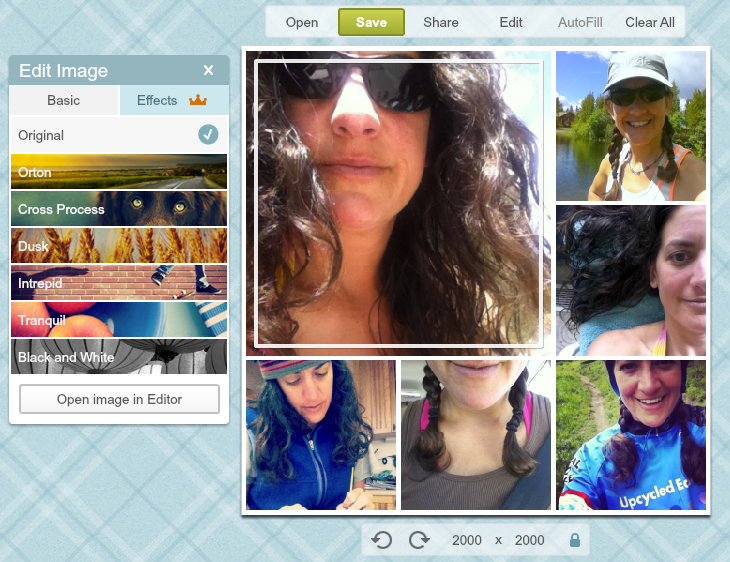
My admiration for PicMonkey just got stronger.  Yep, you heard me.  Strong-er.  Their recent collage update is primo.  You can now edit all your photos right in your collage.  Then, you can transfer the whole collage to the regular side of PicMonkey and add textures, overlays, doodles, text, the works!  I am in love.  Pure PicMonkey love.

The updated PicMonkey interface looks like this (photo below).  It is easy-peasy to edit each photo now.   Yay!


Oh, and if you are wondering why all the selfie shots above and in my Instagram feed.  Before you think I've gotten all full of myself, I am taking the A Beautiful Mess 30-Day Selfie Challenge and  expanding my phoneography skills (yes, new 21st century word).  Quit frankly, I could use some phoneography skills.  Have you seen all my blurry iPhone photos the last few weeks?  Oh my.

Back to PicMonkey.....

I was exploring all the cool features PicMonkey offers because I had an extra moment. Since I hardly ever play with the textures, I popped those open to see what the textures looked like.  I love distressed things.  The smudge texture used below would be cool for the right photo or project.


Hey, look - selfies on fabric!  This was another interesting texture you can add.  This one is called weave.  The faux seamstress in me likes this.


Alrighty, my dear friend and blog reader, I must run - the mountains and summertime are calling me.  Go play with PicMonkey and send me a link to whatever you create or alter.  Then, I will cheer and hoot and celebrate our enduring Pic Monkey love.

xoxo,

Jen


Joy of Appreciative Living

Lil O and Mr. UpCyclist hiking in Colorado
Photo: Lil O and Mr. UpCyclist hiking in Colorado

I am a big fan of public libraries especially good ones.  At our local library in Colorado - a superb library for such a small town - I checked out 21 books.  Yep, you heard me.  Twenty-one.  Books for me, Mr. UpCyclist, Lil O and even Jedi (well, books about dogs and how smart they are).

Anyway, some of the books I chose.  Other books chose me.

This book, The Joy of Appreciative Living, was one of the books that chose me (affiliate link).  I'm glad it did.  I've been practicing the daily exercises for two weeks now.  I even did the big weekly activity - visualizing the life you want to lead.  There is something about this book that resonates with me.

Jen's Journal

I think it reminds me of life coaching with Sue and reframing everyday situations - especially the sticky ones.

If you have space in your summer reading queue, I highly recommend The Joy of Appreciative Living.  Plus, page 47 has the best, reflective questions.  I have become a big fan of good, curious questions.

xoxo,

Jen


Jedi Hearts Paint Swatches


I was just looking at the statistics for Upcycled Education, did you know the #1 post is the one related to using paint swatches in the classroom?  That makes me laugh!

...But, you know I adore paint swatches.

Evidently, Jedi does, too.

Ha!

Love that dog (and paint swatches),

Jen

PS - Just in case I haven't mentioned how much I love Colorado to you lately, please let me take a moment.  Reason #1001:  Dogs are welcomed in 90% of the non-food businesses.  Jedi goes into toy stores, home improvement places, bike shops, outdoor stores, gift shops, book stores, you name it.  Dogs are welcomed.


String Art Love + Tutorial {for Tech Tuesday, say what?}


We interrupt today's Tech Tuesday for this important message....tutorial......

My Denver BFF and I have a new tradition.  Each summer we do one major art project together.  Last summer, we made the most adorable burlap garland for her sister's baby shower.  This year, string art!

Our condo in Colorado is lovely with really tall ceilings, but it is in desperate need of artwork.  The color palette right now is very neutral.  We really haven't done much with the wall space.  Take this space as an example.  

Boring space in need of art

To make the string art, we used this tutorial and this one to guide us.  Of course, we learned some tips and tricks along the way - which I will share below.

Ready?

Step One:  Gather supplies -  Embroidery thread (at least two skeins per letter), hammer, print-out of words (more on this in a moment), tape, hammer, ladder, and nails (we used steel nails from Lowe's.  They were 1.25 x 16 size).  As you can see from this supplies list, this project is inexpensive.  Maybe I spent $12 on all the supplies (we already had the hammer, ladder, and tape).
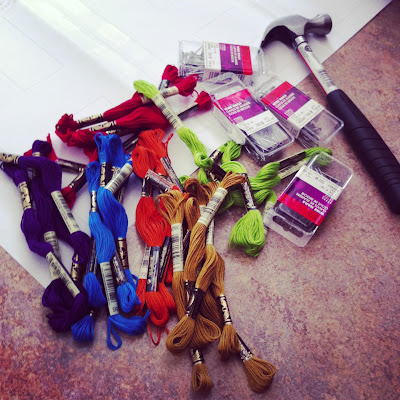
String art supplies

Step Two:  Mark guidemarks on the text printout - I made a "banner" of the text (Hello, Breck) on my PC computer using Microsoft Publisher.  I found using Publisher was the easiest as it has a built-in banner option.  I chose a clear, slightly thick font and made the letters almost 8.5 x 11 size so the text would be nice and big (and clear).  I also chose "outline" for the text, so the letters were outlined and not totally filled in with black (I was trying to save my printer's ink).  On each letter, my BFF and I marked the spot where we planned to hammer the nails.  That was Mr. UpCyclist's idea and it was quite helpful.  TIP:  If you want your letters to follow the font you chose and not get too squared, the more nails the better!  In fact, my BFF and I ended up added some nails when we thought the letters were looking too squared.  Thus, go heavier than you might normally go with your nail placement especially on curved letters.

Marking nail guides for string art

Step Three:  Decide on your color line-up - Lil O was our assistant for this.  In the end, we decided not to follow a color pattern and make the colors appear more random.  Oh, and sorry about the blurry photo....I really need a "real" camera.

Lil O helps determine color order for string art


Step Four:  Hang the banner - We used a laser level to help us hang the paper banner straight.  We also used blue painters tape to affix the banner to the wall.

Using a laser level to hang string art banner

Step Five:  Start nailing!  My BFF started from one end.  I started from the other.  We just nailed directly into the paper banner following the guidemarks we made in step two.  I even used a small craft hammer to nail and it was soooo simple.  TIP:  We found it was best to nail from right to left (meaning, start with the end of the text first). That way your hand/palm doesn't keep rubbing against the nail heads.  Yes, you can thank us later for that tip :)

Nail right into paper banner for string art

Step Six:  Gently pull off the paper - This part was so smooth.  The paper came off almost effortlessly.  However, we did think it looked so strange.  Are there really letters there?  It looked like a mish-mash of nails to us.

Gently pull off paper banner for string art

Step Seven:  Start wrapping your embroidery thread - This part was completely enjoyable.  I think we both agreed this was our favorite part.  

Close-up of wrapped letters for string art

We do have some TIPS for this:
  • Use two embroidery threads at the same time to make your lines thicker and the colors pop more.
  • We started each wrap in the bottom left hand corner of each letter.  However, in the end, we don't think it is noticeable where you tie off your knots.
  • Speaking of knots, we used a simple overhand knot to secure the thread at the start and end points.
  • We tried to finish each letter in the same spot we started, but that didn't always work out - which was just fine when you use a small, tight knot.
  • We started each letter by outlining it twice first (going around each nail in a clockwise fashion).  Then, we started filling in each letter with no recognizable pattern - just zigging and zagging.
  • Having more nails (vs. less) gives your patterns (and zig-zags) more options.  We vote for more nails!
  • Simple letters like an "L" require less thread than complicated letters like an "R."  Thus, sometimes we used every inch of thread and other times, we did not (as we did not want some letters to look too filled in and others to look more skimpy).
  • Every once in a while, we would jump off our ladders to see how the letters looked from afar.  But, in the end, this is such a forgiving project.
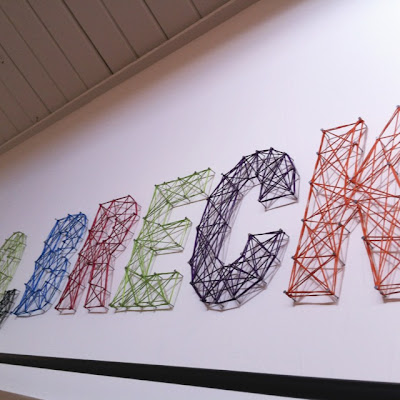
Another close-up of string art letters


Step Eight:  Celebrate!  I know it doesn't look like it, but the string art is really centered and the colors are very bright.   With breaks and our learning curve, the entire project took us around four hours to complete.   When we do it again (notice the "when" part; I loved this project), I think we could knock out similar string art in two hours.

Hello, Breck string art

Here's another shot processed in Instagram.  The colors are really as bright as they appear below:

Instagram Hello, Breck string art

Soooo....we went from this.....

Boring space in need of artwork

To this.....

String art

Yay for string art!

xoxo,


PS - If you have any questions about this project, please leave them for me in the comments section below.

Woodward @ Cooper

Woodward at Cooper Collage

Through a new contact, Lil O and Cousin A spent the afternoon at Woodward at Cooper - an incredible indoor/outdoor training facility for skiing, snowboarding, skateboarding, slopeside mountain biking, bmx-ing and digital media-ing (I like parallelism in my writing, hence the extra -ings).  Lil O has been skiing for six years.  Cousin A just started snowboarding this year.  Woodward, thankfully, welcomes all ability levels.  Yahoo!

There are so many pluses to spending the afternoon at Woodward at Cooper (or any of the Woodwards across the US), buying a season pass to their indoor "barn" or delighting in a week-long camp there.  I mean just look at the photos above and below.  These gals burned some serious calories, smiled endlessly, and the atmosphere & staff encouraged trying new things.  Trying new things in a safe and helpful environment?  I'm a supporter!

Woodward at Cooper Collage Two

There are trampolines, foam pits and ramps everywhere as you can see in the photos.  The girls practiced flips, twists, and turns.  There is even two outside areas to practice moves (see upper left photo below).  The other outdoor space is full of snow.  Yep, you heard me.  Real. Snow. 

When you are on a bike, a skateboard, roller skis or a board, you can launch into these deep, wide foam pits.  Neither Lil O nor Cousin A had their ski/board boots with them, so they spent their time practicing moves that will help with balance, transitions and tricks when winter rolls around.

Woodward at Cooper Collage Three
Watching them for the afternoon at Woodward at Cooper made me crave two things:  1) winter sports and 2) wishing we had a Woodward in Maryland - hint, hint.

Since I'm an educator, I had a kinda wonky, but uber-cool idea.  What if Woodward (they have four locations across the US - Colorado, Pennsylvania and two in California and their new location in Maryland, Ha!) had a Woodward School. Yep, a school where you learn reading, writing, math, social studies, and science through the Woodward way.

....which really means every kid will be happy, active, nurtured, and engaged.

A total score to me as a mom, educator and lover-of-cool-things.

I'm in.  Are you?

PS - Cousin A said the two highlights of her week in Colorado were bouldering on "real" rock and Woodward.  Yippee!

PSS - Please forgive the slightly blurry, iPhone photos above.  It is clear that Nikon or Canon needs to sponsor Upcycled Education next year.

PSSS - Big thank you to Wade, Krista, Pete, Chris and Coach Greg of Woodward for taking care of sweet Lil O and Cousin A.